
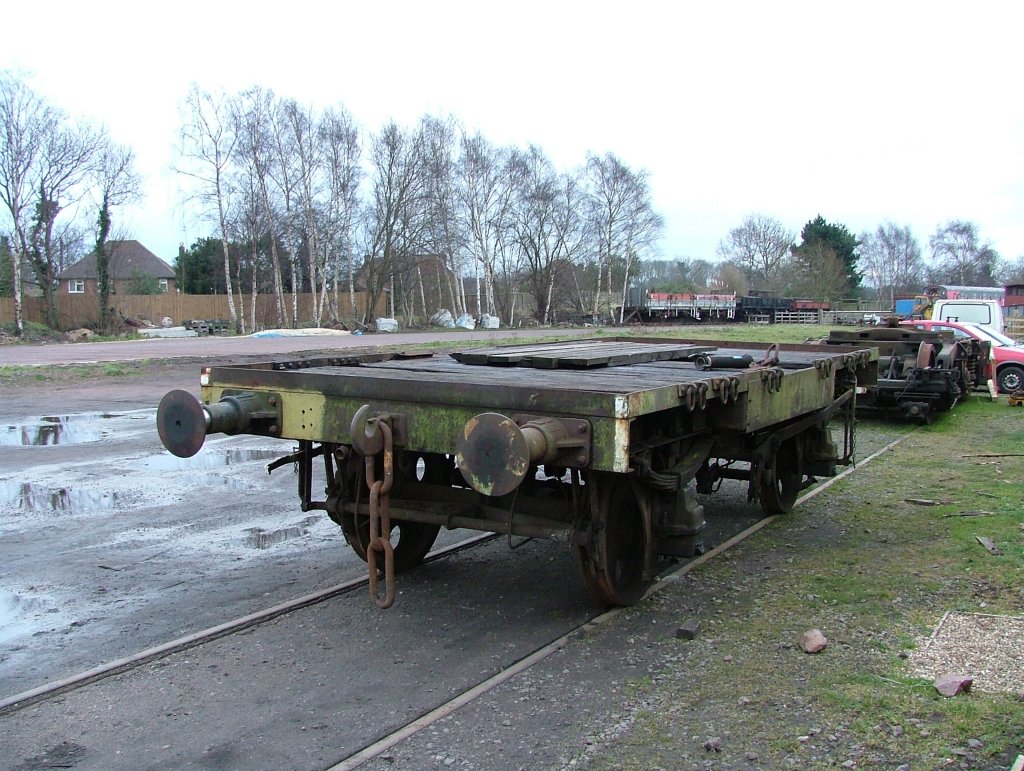
B737695 at Hoo Junction just before it's transfer to the Isle of Sheppey.
Photo © Bob Wallace 17/05/81. Used with permission.
B737695 was built at Ashford in 1959 to diagram 1/069 as part of lot number 3107 (400 wagons), and is an '11T Conflat A' to give it its full title. Despite being to the same basic design (diagram) as the Pressed Steel examples, it is actually built on a completely different underframe - which, for a flat wagon, means that there isn't actually very much the same about it!
The wagon is fitted with vacuum brakes, plain bearings and is supposed to have screw couplings (it currently has an odd assortment of other types!). Its tare weight is 6 tons; '11T' refers to its carrying capacity although with the containers rated at just 4 or 5 tons and weighing less than 2 tons themselves, it seems unlikely that this limit would ever be reached in practice.
In August 1979 the wagon was transferred to departmental use, becoming ADB737695. The 'A' prefix indicates that it was used by the Mechanical & Electrical Engineers, a suitably vague title. At this time the wagon was located at its 'birthplace', Ashford, though how far it had wandered in the intervening 20 years is not known.
B737695 at Hoo Junction just before it's transfer to the Isle of
Sheppey.
Photo © Bob Wallace 17/05/81. Used with permission.
By June 1981 the wagon was at Hoo Junction, where it was condemned and disposed of to the Queenborough Rolling Mill on the Isle of Sheppey. There it was used as a test weight wagon, until it was preserved, probably around 1999, at the Lavender Line in Sussex, before being declared surplus and sold to a dealer in Norfolk in early 2001. It was purchased from there on 5 December 2004 and moved to the GCR on 25 January 2005.
Although lot 3107 was a small batch by Conflat standards, B737695 is not the only survivor - though I believe that it is the only one in original condition. The National Railway Museum's B737725 also comes from this lot, but is a now-rare conversion for carrying 'Speedfreight' containers. I believe a third example, modified as an adaptor wagon, may still be in use in Derby Litchurch Lane works.
The wagon arrived in a basically complete condition, but had evidently suffered a hard life. One of the 'W' irons (which support the axleboxes) was bent, possibly as a result of derailment damage, and required straightening before it could run. The drag boxes (where the coupling hook attaches) were badly wasted. but these have now been rebuilt with new steel welded in in early 2007. One side and one end had some nasty dents, and nine of the twelve shackles (for fixing the chains to) are missing from one side. Without these we can't secure a container onto it, so I may need to have some made unless I can find a source of spares. It also needs three chain pocket lids, two new vacuum hoses, and I expect to have to replace some or all of the floor timbers. There is also a lot of rubbing down and painting to do!
Due to the light weight of this wagon and the fact that it is fully braked, there is a risk that the wheels could lock up under heavy braking, causing wheel flats. In BR days they were also prone to derailment under these conditions, particularly if coupled to anything heavy. The best way to avoid these problems is probably to add a container to it - and then fill it with heavy stuff!
 B737695 newly arrived at Quorn. Photo © S. Sanders 25/01/05. |
 Note shackles missing from the other side. The shackles were evidently removed by grinding off the rivet heads (see photo on right). Photo © P. Hetherington 30/01/05. |
 Can anyone tell me what the additional single hole to the left of this shackle was for (towards the centre of the wagon)? And what was the missing plate just below? Photo © P. Hetherington 30/01/05. |
 This top view shows the chain pockets on one side. Only the uppermost pocket on the picture retains its original lid. Photo © P. Hetherington 30/01/05. |
 Bent W-iron. Photo © P. Hetherington 30/01/05. |
 Rusty drag box, north end. Photo © P. Hetherington 30/01/05. |
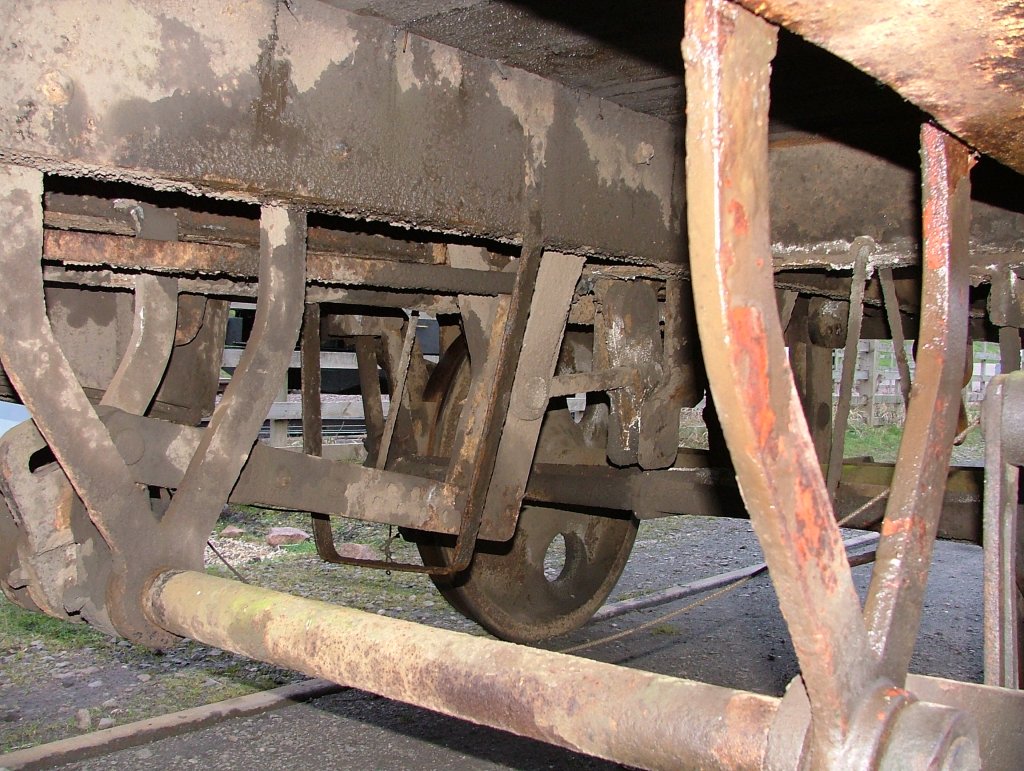 Underframes (bring a wire brush!). Photo © S. Sanders 25/01/05. |
 Original works plate. These have now been removed for safe keeping. Above this can be seen the remains of the original livery. Photo © P. Hetherington 30/01/05. |
| To be continued... |
 Photo © P. Hetherington 10/05/05. (Self-timer!) |
Nine shackles were missing from this side of the wagon when bought. The rivet heads of the other three on this side had been ground off, so these three need to be removed and re-riveted. One of them has now been removed and will be used as a pattern to produce some more. |  Photo © P. Hetherington 10/05/05. |
 |
There is little progress on this wagon at present as I am
concentrating efforts on my Palbrick. However, as both wagons
featured a curious mix of OLEO buffer styles, I decided to swap
some of them around to give four matching buffers on the Palbrick
and two matching pairs on the Conflat. Thus the Conflat now
features two blue buffers, which have been temporarily fitted so
that the wagon remains mobile. They'll have to come off again when
restoration commences in earnest. Photo © P. Hetherington 08/01/06. |
I've been rebuilding the dragboxes on my Palbrick and have reached the stage where there is only half a day's welding left to do. In order to make sure that the welder has a full day's work next time he comes, the obvious thing to do is to get the Conflat's dragboxes done at the same time. So I've been spending a few days stripping them down.
 Photo © P. Hetherington 20/01/07. First job is to remove some floor timbers, then the split pin and large nut from the back of the draw-hook. |
 Photo © P. Hetherington 20/01/07. Then withdraw the draw-hook itself. |
 Photo © P. Hetherington 20/01/07. Then this plate, which is held in by four welds - although at the north end, the right hand welds had broken. |
 Photo © P. Hetherington 21/01/07. Using my trusty gas-axe I chopped out the front portion of the rotten upper dragbox channel from the north end of the wagon. |
 Photo © P. Hetherington 21/01/07. This left the back portion, which was forced out of place by driving a chisel up behind it through the aperture in the headstock, and then finished off with a crowbar. |
 Photo © P. Hetherington 21/01/07. With the upper channel removed, the dragbox looks like this. |
 Photo © P. Hetherington 21/01/07. The channel from the south end was in better condition and came out in one piece. It did need changing though as it was going quite thin around the area of the drain hole. |
 Photo © P. Hetherington 21/01/07. With the cutting gear handy, I burnt out the remains of the rivets which had held the shackles onto the east side. These had had their heads cut off at some time prior to preservation, so they needed to be removed prior to re-instating the missing shackles (which I don't yet have). |
 Photo © P. Hetherington 22/01/07. The following day I returned to grind flush the inside of the south end dragbox. I'd have started the north end too, but it was too cold! |
 Photo © P. Hetherington 28/01/07. |
On Saturday I finished grinding flush the north end dragbox, then on Sunday I cut the slots for feeding the new channel in. These were cut with a cutting disc and then finished off with a grinding disc. The slots are much bigger than they need to be, because the underframe channel in this area was quite badly wasted so needed renewal anyway. The photos show the north end of the wagon, but the south end has received similar treatment. |  Photo © P. Hetherington 28/01/07. |
 Photo © P. Hetherington 11/02/07. |
Saturday afternoon was spent cutting the new dragbox channel to length, cutting the 'outer' edge to depth and cutting the diagonals for the 'inner' edge where it fits into the wagon. They still need drain holes, and they haven't been tried for size yet so minor fettling may be required. |  Photo © P. Hetherington 11/02/07. |
Monday was spent cutting four pieces of steel to go in the slots after we've fed the new channel in. As the channel section of the underframe is tapered at the edges, these were cut from similar channel which used to be part of the Freightliner dragboxes which were added to the Palbrick in 1967 and removed during the restoration of that wagon. Well, there seemed to be no point in wasting it! |  Photo © P. Hetherington 11/02/07. |
Finally, Tuesday was spent needle gunning and wire brushing the inside of the dragbox on the north end of the Conflat. This job is so much easier with the upper channel removed - in fact the worst of the scaling was between the removed channel and the headstock. |
 Photo © P. Hetherington 11/02/07. |
The main job this weekend was to needle gun, wire brush and paint the south end dragbox to match the north end which was done last week. |  Photo © P. Hetherington 11/02/07. |
 Photo © P. Hetherington 11/02/07. |
In-between wire brushing and painting, I decided to try the new channel for size. A little fettling of one of the slots in the wagon frame was necessary at the north end, in order to get the channel in; it's seen here temporarily propped in position, but it still needs a drain hole and a little more grinding on the 'outer' edge in order to get it to fit correctly. | The south end channel went straight in; in fact, it is a little on
the loose side, but not enough to worry about. It also needs a drain
hole and a little fettling to get it to fit properly. Finally, I noticed that last week's needle gunning had missed a few bits in the upper corners of the north end dragbox. Some extra de-scaling was carried out, this time with a hammer and chisel, and another coat of paint was applied. |
 Photo © P. Hetherington 18/02/07. |
On Saturday the drain holes were drilled for each dragbox
channel. On Sunday the main focus of attention was the Palbrick but, once that was done, a good start was made on the Conflat's north end dragbox, with the new channel in place but a couple of additional runs of weld needed to finish off. And if you thought access to the Palbrick dragboxes looked awkward, try this! The problem is compounded here by the presence of a vacuum pipe. |
 Photo © P. Hetherington 18/02/07. |
Another little job done was to weld up a cut in the Conflat's side
rail. I'm not sure why someone had started cutting this bit - the
wagon arrived with the damage already in place. A little reminder that looking at welding sparks is not a good idea - and I certainly wouldn't do so through a camera lens! This picture was taken using the display screen on a digital camera. |
 Photo © P. Hetherington 25/02/07. |
Dave's first job this weekend was to finish off the welding on the north end dragbox channel. |
 Photo © P. Hetherington 25/02/07. |
That done, the south end channel was welded in to match, and then Dave started on the two fillet pieces to repair the underframe where the dragbox channel had been slotted through. |
 Photo © P. Hetherington 25/02/07. |
While all that was happening I wire-brushed the plate which sits on the inside of the dragbox. This was then welded back into place. |
 Photo © P. Hetherington 25/02/07. |
The fillet pieces and inner plate were similarly welded at the north
end of the wagon, and finally both ends were painted with primer.
And yes, once again I ended up painting in the dark! The welding on this wagon is now finished. The drawhooks will be re-assembled over the next couple of weekends, then the next phase of restoration will probably have to wait until the wagon is moved. |
 Photo © P. Hetherington 11/03/07. |
I dropped by on the 10th to touch up the primer in a few places
(having applied it by moonlight...) and then on Sunday painted both
dragboxes into undercoat. They are certainly not designed to be
painted easily! The coupling hooks received similar treatment, but a couple of smaller parts are still awaiting wire brushing. |
 Photo © P. Hetherington 18/03/07. |
On Friday I painted the dragboxes and coupling hooks into top coat -
they look a bit incongruous on such an otherwise rusty wagon. The bits and pieces which go on the inside end of the coupling hook hadn't been touched at this point, so on Saturday I wire brushed them, painted them in primer, and then later on painted them in undercoat. Unfortunately the weather on Sunday was atrocious, so any thoughts of top-coating the loose bits were abandoned. Next time! |
 Photo © P. Hetherington 18/03/07. |
 Photo © P. Hetherington 25/03/07. |
All of the loose bits are now painted in top coat; re-assembly of both dragboxes should follow shortly. |
 Photo © P. Hetherington 06/04/07. |
Both drawhooks were re-assembled into the rebuilt dragboxes, following
which the final areas - the tips of the hooks, and the securing nut -
were painted in primer. Grey undercoat followed the following day,
and top coat on the 16th. That done, the Conflat will now return to its
previous slumblers while I continue to concentrate on the restoration
of Palbrick B B462772. The next job on the Conflat will be to straighten out all of its various knocks and dents, but this requires the use of the heating gear which does not travel well on rough ground, so I'm hoping that the wagon will be moved to a more accessible location before then! |
 Photo © P. Hetherington 06/01/08. |
The Conflat was moved in late 2007; its new position is much more
accessible so reaching it with the oxy-propane kit is more feasible.
Painting the Palbrick has stalled somewhat due to the winter weather,
so I decided to do a bit on the Conflat. There are various bent bits to straighten but I decided that I needed to use up the remaining contents of the old oxygen cylinder before tacking the 'W' iron, so where better to start than the bent kerb rail? After a morning's heating, hammering and levering, it is now considerably less bent than it was, although still not perfect. It's a start! |
 Photo © P. Hetherington 06/01/08. |
 Photo © C. Green 18/01/08. |
Armed with a fresh oxygen cylinder, it was time to attempt to
straighten the bent W-iron. I made a start, ably assisted by Colin
in-between other duties, but unfortunately I didn't get very far
before running out of gas! Thus, comparing the detail picture below
with the one taken three years earlier probably doesn't show any
appreciable difference. Apart from the obvious large sledgehammer, the other tool for this job is a 'mundy bar' and it's an impressive piece of kit so I've included a photo of it. Thanks to Railway Vehicle Preservations Ltd. (RVP) for allowing me to borrow this. |
 Photo © P. Hetherington 18/02/08. |
 Photo © P. Hetherington 18/02/08. |
 Photo © P. Hetherington 24/02/08. |
Having collected a fresh gas cylinder, I carried on attempting to
straighten the bent W-iron. It has been a frustrating experience - I
don't think I realised just how bent it was, and to straighten it
really needed about six places heating at once, which of course was
impossible. After a day of heating, hammering and levering, including
putting the mundy bar on the bottom and standing on it, these photos
show the result. It isn't pretty, and the outer edge is still bent, but if you look at the right hand photograph you can see that the critical edge next to the axlebox is now reasonably straight, and I think that's probably as good as we're going to get it. The next job is to seek expert guidance to see if it's now safe to run... Incidently, the brake shoe nearest to this W-iron is cracked - whether this is dates from whenever the W-iron got damaged or was caused by me accidentally hitting it with a sledgehammer, I'm not sure! But upon further inspection, the diagonally opposite brake shoe is cracked too, so it'll need some new ones. |
 Photo © P. Hetherington 24/02/08. |
 Photo © P. Hetherington 07/03/09. |
This was the first time the Conflat has seen any attention for a while, but I had the oxy-propane kit out for another job so thought I'd have a go at the remaining bent kerb rails. In the end I spent pretty much the whole day on it, with the remaining (worst) side and both ends seeing some attention. The photos to the left and right show (via the heat marks) just how many individual knocks and dents I tried to get out of the north end of the wagon - with a reasonable level of success, I think. |  Photo © P. Hetherington 07/03/09. |
 Photo © P. Hetherington 07/03/09. |
 Photo © P. Hetherington 07/03/09. These 'before', 'during' and 'after' shots show the straightening of the worst part of the kerb rail, the south end on the west side, using a combination of heat, sledgehammer and turfer. The result isn't perfect by any means, but it's an awful lot better than it was! |
 Photo © P. Hetherington 07/03/09. |
At the moment I'm looking for: